Showing posts with label food. Show all posts

Wednesday, January 04, 2012

Catching Up: All of the things I didn't write about when I really should have written about them

Hey there! I know, my time for doing the 2011 Year in Review posting was soooo two weeks ago, yet here I am leaping onto the bandwagon. Or perhaps I'm just stumbling after it.

Only time will tell.

The children have all gone back to school today - Caitlin to her last semester in Elementary school and the twins to their last semester in Pre-school. Come fall I will have one child in middle school and a pair of kindergarteners! How crazy is that?

Certifiable, that's how crazy!

We went on a tour of Caitlin's Junior High Middle School last night, she and I, and I was markedly impressed. I am hereby remarking upon it. I'm hoping she loves it as much as I suspect she will. So many programs and clubs!

Anyway, last year...was a whopper. There were a number of very good things about it and some seriously miserable things. If you've been following along, you'll know of what I speak. I'll try to focus on the good stuff instead of sniffling over my keyboard.

Perhaps reverse order?

Xmas 2011 was very close to being a wash. Turns out that someone around here needs to start taking her vitamin D pills starting in September so that it has a chance to build up in her system. You know, in case you want to avoid a serious case of the Bah, humbugs! by the time Christmas rolls around again. I didn't get cards done or mailed packages to family. Let's just say I take after Dad on this one. Who's up for Christmas in July?!

The family came through for us on Xmas. There were all kinds of things from the cousins, grandparents, aunts and such. I didn't feel bad that we didn't add to the insanity other than a book apiece and a single DVD. Well, if you don't include the stockings. Those were full of chocolate this year (Plus the traditional apple and orange, although I subbed a Clementine for a regular orange. Must more kid friendly.). Which everyone ate while I was still in bed, as you can tell from Little Miss Chocolate Face right here.


Logan gravitated to the largest box under the tree.  Turns out it was a Lightning McQueen springy tent thingy. He loves it. He jumps on it. Love and mangling go hand in hand, don't they?


I only asked for one thing this year. Well, other than no whining and fighting. Eric came through with a 50mm 1.4 lens! Woo! Here is a lovely shot of my test subject.


I'll have to play with the lens more in the new year. I look forward to more sexy bokeh!

This year's Spelling Bee fell on Eric's birthday, which doesn't actually explain why there are no photos of the tiny dinner party we had for him, but there it is. Caitlin didn't win the Bee this year, but came in 2nd place. She was undone by the word "laborious" by adding an extra "u". I was sad the Bee didn't go on longer because I really enjoy when you're down to the last two contestants and the words start flying back and forth, getting harder and increasingly esoteric. Ah well. She's got 3 more years of Bees, if she still wants to go for Nationals! We applied prescription levels of ice cream and all was right with the world.


During the first weekend in December, I shot my friend Susan's baby boy's first birthday party. Tiny red heads are so cute!

Perhaps I'll get back into the swing of photography again this year? At some point I'll have to determine what I want to do with myself once the twins are in school full time. I'm debating going back to school, the only question remains, for what?! That, however, is a discussion for another time. Deep, dark, soul-baring discussion.

In seemingly typical me fashion, I have pictures of the bread I made for Thanksgiving, but no pictures of Thanksgiving festivities. I fail the acid test of diehard scrapbookers. Clearly I'm not a scrapper.

Three versions of braided bread. Left: 6 strand braid; middle: 3 strand braid; right: 2 strand braid.


But...! But the bread was really good!

In the middle of November, still on the bread theme, I was testing out the differences in retarding my sourdough overnight versus baking it off the same day it rose.

Bread on the left retarded in the brotform overnight in the fridge. Maintained the shape better, but had less oven spring and grigne than the one on the right, which I baked the same day as final fermentation.

Either way, it was delicious.

In early November, we made a "surprise" trip to KS for Val's 40th birthday.

Except for one small problem: she wasn't surprised. Turns out her boyfriend can't keep a secret to save his life! I offered to pummel him, but he declined.

On Halloween, we got dressed up and took the kids Trick or Treating, but then completely forgot to take pictures of them in their outfits! It it wasn't for Misty requesting photos of her ultra cool Raven costume, there wouldn't be one of either Eric or I in our Archer/Lana Kane outfits either. Whoops!

In mid-October I finished the dining room painting and hung the floating shelves with Eric.

The finished art cabinet is in the corner. Keeper of all things paper, paint, and crayon related.

My String of Pearls plant won't survive the winter outdoors. Turns out that it can't survive my care indoors, either. Sadly, most of the succulents pictured here are dead now. I'll have to some up with an alternate display!

Wall of succulents brought in before the weather got too cold. 

I'm so glad I finished painting the main floor. It makes a huge difference in how I feel about the house. In early spring I'll work on the rest of the painting. I need to be able to keep the windows open. Even low VOC paint has fumes that make my head spin in enclosed spaces.

In late September, the twins turned 4 and we had a party. Not that you noticed, since I didn't post anything about it in Blogland. Nope, skipped over it entirely on the blog, but posted pics on Facebook for my mom to see.

The big cousins, plus Marlena.

The cupcakes. This is as fancy as I got. Chocolate cupcakes with mint frosting, pink sprinkles for Emma with princess toothpicks and red sprinkles for Logan with Cars toothpicks. Tah-dah! Decorated! No balloons, no matching tableware and a whole lot less to throw away at the end of the party. Somewhere in Canada, my kid sister is stunned by how undecorated it all is. We have opposite birthday talents: she's amazing at decorating. I put all my energy into the food.

Emma shows off her princess cookie. Those were my goodies for the goodie bag: a single enormous sugar cookie with Royal frosting and pink or red sprinkles. Once again, "simple" and without a lot of trash or little plastic bits to get vacuumed up later.

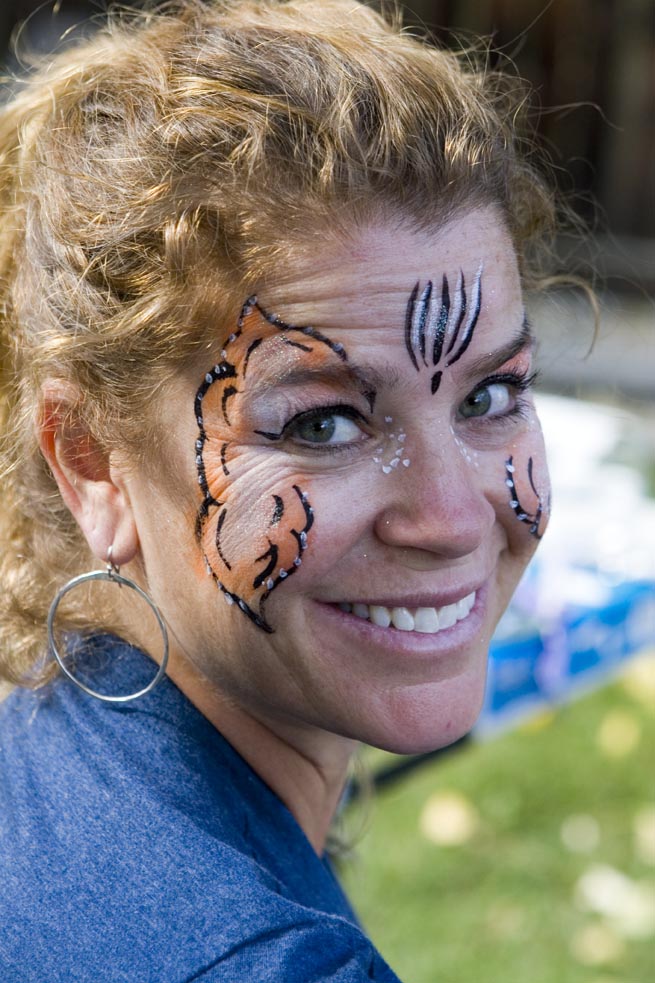
We had our very own in-house facepainter at the party! Grammy Linda has taken on a new career as a facepainter and was doing up adult and child guests alike. Jenni makes a lovely butterfly.

Emma and Logan made a new friend at preschool: Asher.
King for a day!

Logan shows off his car cookie chomping skills.

The twins still love it when everyone sings. It's much more difficult to take pictures of them when they're no longer held in place by highchairs!

In between ferocious painting episodes, I stopped on occasion and enjoyed my hummingbirds.

Other than losing weight (Or, to be honest, just temporarily misplacing it since it seems to have found me again...), gaining muscle and then falling off the horse again (hard), the rest of the year was all related to Dad. The big drive cross country. Family. I still have yet more pictures from Canada to edit, which I'll get to this week.

I know, it's only been 6 months!

Whoops! Better go get the twins from pre-school! Ciao!

Friday, May 06, 2011

Recipe: Triple Coconut Cupcakes (When Double Coconut Cupcakes just aren't enough for your coconut needs.)

What is it about coconut that you either love it or hate it? Some of the folks I know can't stand this nut, while my family and I are all for it.

I suspect my Jamaican heritage is at play here, as well as in my rabid love of all things mango.

To whit, when I took a pastry class, lo these many years ago, one of the recipes was for coconut cake. Mind you, this isn't just a recipe for white cake with a marshmallow-like frosting that has toasted coconut sprinkled on top. This is coconut cream and coconut extract, coconut buttercream frosting and toasted coconut. Or you could try to mix it up with a coconut cream cheese frosting.


Triple Coconut Cake with Mods for Cupcakes
Adapted from Cooks Illustrated by the Cooking School of the Rockies and again by moi.
Cake recipe with Mile high elevation changes listed in parentheses.

5 lg egg whites @ room temp
3/4 c cream of coconut
1/4 c water
1 lg egg, room temp
1 tsp coconut extract
1 tsp vanilla extract
2 1/4 c cake flour (Add 1/4 c extra flour for mile high elevation for a total of 9.8 oz cake flour)
1 c sugar (Less 1/4 cup sugar for elevation)
1 tbsp (Only 2 tsp in CO) baking powder
3/4 tsp salt
12 tbsp unsalted butter, cut into 12 pieces and softened (I've used salted butter and just dropped the amount of salt added by 1/4 tsp, works fine.)

1. Set oven to 325°F (340°F for elevation) with rack set to middle position. Lightly coat 2 9" round cake pans w/ veg oil spray and then line bottoms w/ parchment paper circles.
2. Whisk egg whites, cream of coconut, water, whole egg and extracts together in lg bowl and set aside.
3. Whisk flour, sugar, baking powder and salt together in a large bowl. Beat in the butter, one piece at a time, with an electric mixer on low speed until the mix resembles coarse crumbs, about 2-5 min.
4. Add 1 c of egg mixture, increase speed to med-high and beat until light and fluffy, about 45 sec. Add the remaining egg mix in a steady stream and continue to beat until batter is combined, about 30 sec, scraping down the bowl as needed. Batter will be very thick.
5. Divide batter evenly between pans and smooth tops. Bake approx 30-35 min, rotating pans half way through baking time.
6. Cool cake in pans 10 min on wire racks. Run a small knife around cake edge to loosen and then invert onto racks. Remove parchment paper, let cool completely before frosting, 1-2 hrs.

Mods for Cupcakes:
1. Set oven to 340°F. Oil muffin tins or use cupcake liners.
2. If you don't have cake flour, you can use 7/8 c AP flour + 2 tbsp cornstarch for every cup called for in the recipe. Total weight again is 9.8 oz. The cupcakes were no longer dished in the center when I did it this way.
3. Stick with 3/4 c of sugar for high elevation as called for in recipe.
4. Baking time will be less than 30 min. Check with toothpick after 15-20 min, being sure to rotate after 15 min.
5. Makes approximately 21 cupcakes when I used an ice cream scoop to ladle out identical amounts in each muffin tin. I highly recommend the ice cream scoop method of batter portioning. That way, they're all the same size and should bake at the same rate. Also, fewer arguments about this one getting a bigger/smaller cupcake than that one.


Coconut Buttercream Frosting
2 tbsp heavy cream
1 tsp coconut extract
1 tsp vanilla extract
pinch salt
16 tbsp unsalted butter, softened (If your butter is salted, don't bother with the pinch of salt. You may notice the frosting being salty, or it may just cut down the sweetness a little. Try it, if that's all you have on hand, and see if you like it that way. I do.)
1/4 c cream of coconut
3 c confectioners sugar, sifted
2 c toasted sweetened, shredded coconut

Stir cream, extracts and salt together until salt dissolves. Beat butter and cream of coconut in a lg bowl w/electric mixer at med-high speed until smooth, about 20 sec. Reduce speed to med-low, slowly add confectioners sugar, and beat until smooth, 2-5 min. Beat in the cream mixture. Increase speed to med-high and beat until the mixture is light and fluffy, about 4-8 minutes. Assemble cake and press toasted coconut onto sides and sprinkle across top. For cupcakes, you can either slather it on with a palette knife or use an icing bag and a large tip like the Wilton 1M. Pretty!

Coconut Cream Cheese Frosting
8oz cream cheese, room temperature
1/4 c butter, room temperature
1/4 c cream of coconut
1 tsp vanilla extract
1 tsp coconut extract
3-4 c confectioner's sugar, sifted

Mix cream cheese and butter together until creamy. Add cream of coconut and extracts until combined. Add confectioner's sugar 1 cup at a time until frosting is thick and smooth. Top with toasted coconut.


Now, be careful! These things are addictive.

Seriously.

If you need help, call me and I'll throw myself on a batch for you. Ayup.

Hatchet: keeping the world safe from unwanted cupcake consumption.

Monday, May 02, 2011

Oh! Hello there!

So...how you doin'?

What?! Do I really think I can just waltz right back in here just as easily as that without an explanation? Do I? DO I?!

Um...I've been, you know...busy!

There have been plants
Prairie smoke in the front yard.

and Easter egg hunts;
 Logan searches high and low. Well...OK. Just low.

cleaning up the garden and growing tiny plants from seed;

Chamomile, calendula, TX sage, cardinal climber, parsley, and zinnias.

Tomatoes, bell peppers, cucumbers, basil, thyme and an itsy bitsy heliotrope.

getting my house painted,
 Blue!

and buying a new car and selling off my old one.

Well, OK, that's a minivan, but kind of a cool one. Caitlin now has her very own row and the twins can no longer punch her in the face. Ahhh! The soothing sounds of a little less whining!

There have also been cupcakes,
 Coconut cupcake with coconut cream cheese frosting and toasted coconut flakes. Is it good? Ohhhhh yeahhhhh!

because anniversaries and birthdays are coming up and I need to test out some recipes!

I've also been thinking about all of the photos I haven't edited and all of the stories I haven't written. I'll get to them. It's been tough. Being busy with the short people and thinking about my dad; visiting with my mom and sisters; watching the weather and waiting for a chance to do some planting. I even gained a year and didn't mention it back in March. Heh!

You know...life. It just keeps on rolling.

I'm still here, though and that's a good thing!

Tuesday, January 11, 2011

Best Cheesecake EVER: Caramel Cheesecake

Since it was Eric's birthday just recently, I needed to come up with a cake for the occasion. Unlike my friend Val, who always has Red Velvet Cake for her birthday, I make a different cake every time. There are just so many amazing recipes out there, why wouldn't I?

Caitlin had suggested an ice cream cake, but I didn't think Eric would go for it. However, whilst poking around one of my favorite bread baking sites, I saw that she had the recipe for Caramel Cheesecake. Immediately, I knew I had to bake it.

I've made cheesecakes before, and they've turned out very nicely, but this one took the cake (Sorry, I had to say that.) and received top honors. Mind you, it wasn't without its frustrating points. I broke the cake getting it out of the pan. Whoops! The first caramel I made for the topping went too far towards burnt sugar, so I had to toss it and start over again. Whoops! I also determined that next time (For there will be a next time! Oh yes. Yes there will be!) I will chop up the toffee bar finely. Or skip it entirely.

Did I mention this cake was crazy? Graham cracker crust, cheesecake, caramel top and bits of toffee around the edges. It may kill you, but you'll go out with a dreamy look in your eye!

My photo absolutely does no justice to this cheesecake. Instead, go to Wild Yeast's entry. Now that's pretty.

Instead, let me share with you her recipe with a few adjustments I've made.

Caramel Cheesecake
(Cake adapted from Wild Yeast's version of the SFBI cheesecake and Epicurious topping.)
Yield: one 8-inch cake
Time:
  • Mix: 15 minutes
  • Bake: 1 hour 15 minutes
  • Cool: at least 2 hours
  • Chill: overnight
  • Unchill and top: about an hour
  • Chill: 2 hours or longer
Crust Ingredients:
  • 132 g graham cracker crumbs (1 pkg or ~9 graham crackers)
  • 44 g sugar (1 1/2 oz)
  • 64 g butter, melted (2 1/4 oz)
Filling Ingredients:
  • 532 g cream cheese, softened (18 3/4 oz)
  • 160 g sugar (5 5/8 oz)
  • 26 g melted butter (1 oz)
  • 10 (2 t.) g lemon juice
  • 5 g (1 t.) vanilla extract
  • 139 g (3 medium) eggs at room temperature
  • 46 g heavy cream (1 1/2 oz)
  • 46 g sour cream (1 1/2 oz)
Topping Ingredients:
  • 150 g sugar (5 1/4 oz)
  • 14 g (2 T.) water
  • 1/4 t. lemon juice
  • 120 g heavy cream (4 1/4 oz)
  • pinch of salt
  • 2 Heath Bars, coarsely chopped (Any candy bar will do here and you really just need one. I used a high end toffee bar and chopped it finely.)
Method:
  1. Preheat the oven to 285F if you have a convection setting, or 325F for the regular bake setting. Start boiling water for the water bath.
  2. Butter the bottom and sides of an 8-inch cake pan. Line the bottom of the pan with parchment paper, and butter the parchment.
  3. Mix the crust ingredients together well with your fingers. Press the crust into the pan and partway up the sides, to a thickness of 1/4 inch.
  4. In a small bowl, blend the cream and sour cream together.
  5. In a stand mixer with the paddle attachment, cream the cream cheese on medium-low speed until it is very smooth.
  6. Add the following ingredients is this order, mixing on medium-low speed until smooth after each addition and scraping the bowl frequently:
    • butter
    • sugar, lemon juice, and vanilla
    • eggs, one at a time
    • cream/sour cream mixture
  7. Pour the batter over the crust in the prepared pan. Tap the pan on the counter a few times to release any air bubbles.
  8. Place the cake on a rimmed sheet pan and set it in the oven. Pour boiling water in the sheet pan to just below the rim. (This may cause your pan to float. Cut back the water to about 3/4s up the sides of the pan. You want it surrounded by water to act as a temperature regulator and to keep the top from cracking. You aren't sending it on a float trip.)
  9. Bake until the cake has just a slight wobble in the center when nudged.
  10. Remove the cake from the oven and let it cool, still in its water bath, to room temperature.
  11. Run a knife around the edge to make sure it is free of the pan, then invert the cake onto a plate and again onto a second plate so that it is right-side-up.
  12. Cover the cake with plastic wrap directly on its surface, and chill overnight.
  13. Remove the cake from the refrigerator and let it unchill slightly while you prepare the topping. Keep the plastic wrap on during this time so any condensation forms on the plastic and not on the cake.
  14. In a medium saucepan, stir together the topping sugar, water, and lemon juice over medium-high heat to dissolved the sugar. Heat on medium-high without stirring, washing down the sides with a wet pastry brush occasionally, until the mixture turns an amber color.
  15. Add the cream and the salt and simmer over medium-low heat, stirring from time to time, until the caramel is thick but not chewy (gauge the consistency by dripping a bit onto a metal spoon).
  16. Remove from the heat and pour into a metal bowl. Cool at room temperature until it is slightly warmer than body temperature; it should still be quite pourable at this point.
  17. Pour the topping over the cake; use an offset spatula to spread it to the edges and let it drip down the sides.
  18. Top with chopped Heath Bars. (Chocolate bars. Nuts. Crunchy bits of something yummy. Bacon? Maybe not.)
  19. Cover with a cake dome and chill for 2 – 6 hours before serving.
Here are a few of her cheesecake tips:
  • To make a smooth batter, the cream cheese needs to be very soft. Leave it out to soften overnight, or put it in the microwave a few seconds at a time.
  • Keep the mixer on low-medium speed, to avoid incorporating too much air. Scrape the bowl and paddle frequently.
  • Avoid using a Springform pan, which can allow water to seep into the crust when you bake the cake in a water bath (even if you protect the bottom with foil). A straight-sided cake pan works just fine.
  • Cool the cake completely at room temperature before refrigerating or freezing.
  • To cut cleanly, dip the knife in hot water and dry it with a towel before cutting each slice.
I've found that if you have the extra wide, heavy duty foil, you CAN use a springform pan. I tried this recipe initially in a regular cake pan and couldn't get it out of the pan to save my life. Fortunately, once you add the topping, you can't see all of the cracks where it fell apart after I whomped it on the counter to "extract" it. Cracked cheesecake is just as yummy as uncracked cheesecake, so don't fret if the same thing happens to you.

The best part about making the topping for this cheesecake is that once you've done it, you need to realize that you just made caramel. From scratch. And since that wasn't too terribly hard, you can do it again. And again. It's a lot of fun and yummy, too. Add assorted flavors to it and suddenly you have candy to give away to friends.

Or not. I won't tell.


This was my second attempt at the caramel cheesecake and it turned out even better. This time I used a 9" springform pan and only 1 chocolate bar.

Scrumptious. 

Saturday, December 04, 2010

Baking Sourdough Bread

I realized, as I was poking through my posts that I haven't written about bread in awhile.

Some of you are bored already and some of you are dying from your gluten allergies. Sorry about that, but I must carry on!

I've been baking bread, steadily, crazily and continuously all year long. Somewhere in February, I decided to take the plunge and create my own sourdough starter. After days and days of making a slurry of flour and water in little jars and throwing away half of the weird smelling goo daily, it finally started rising, and no longer smelling weird and funky. A month later, I made my first batch of bread. The first batch was kind of funny, but so freakin' yummy that we couldn't stop eating it. I bought a set of bannetons (Bread molds or forms made of coiled reed to help the dough hold its shape while rising.) and learned how to use them. I then created a second starter, this time it was a rye starter. You know, for rye breads.

White sourdough from Bread Baker's Apprentice. Rings of flour are due to the banneton being heavily floured. Pretty!

And I went to work on my slashing and steaming techniques.

Look at the gringe (ear) on that loaf of rye sourdough! Sexy!

Next thing I knew, I had bought yet another ridiculous bread baking book (Bread by Jeffrey Hamelman and no, I'm not being compensated, it's just an incredible book. Not for the beginning bread baker, though.) and was making bread that took even longer to make than the Bread Baker's Apprentice loaves.

Crazy? Oh yes. Yes indeed.

Next thing I knew there were sourdough bagels,

English muffins,

multigrain boules

and loaf after loaf of different sourdough recipes. They weren't all successful, but almost all were fantastic. Now, our every day bread is made of sourdough. It might be a whole wheat multigrain with rye flakes, flaxseed and millet or a nice rye (Hey, it turns out that I like rye bread! It's just caraway seeds that I object to in my bread!) loaf. It all depends on what I'm in the mood for that baking day.

It's also been terribly therapeutic.

The act of taking wild yeast (Captured from the flour itself, not from the air as a TV chef would have you believe. Wild yeast grows on the food source it likes. For example: wheat.) and flour, water, and salt and making something as basic, yet as lovely as bread is rather soothing. The babies may be crazy, but look at this bread!
Pain au levain. Sexy French sourdough bread.

Making it has been fun, and I've learned an awful lot. I even put some up for sale for a good cause and have given away dozens and dozens of loaves (Which is the only reason I'm not the size of a whale, at this point!) to friends and family.

It's a helluva hobby. Considering how far I've come in the last year, I'm kinda worried what next year's leap will be. Will I start grinding my own grain? Planting an acre of wheat? Aiee!

Well, instead of worrying about it too much, I think I'll go have a slice of the Jewish Rye with caramelized onions I have sitting in the breadbox. It's calling to me, you see.

Graiiiiins!

Thursday, November 25, 2010

Happy Thanksgiving! Now with more cookies!

I went to two different craft stores, three different kitchen stores, three grocery stores and then finally found what I was looking for in a hardware store. Then again, it's the hardware store in Boulder, so maybe it's not such a big surprise that they carried turkey cookie cutters.

Among about a million billion other items as well. However, that's neither here nor there. (Mostly it's there.)

Instead, I went on a wild bender and bought turkey, bear, maple leaf (Oh, Canada!),  airplane (For Logan at Eric's insistence. I'm sure that it's just for Logan. Uh huh.), kitten and flower shaped cutters. Hey, they were 69¢ each! How could I resist? Clearly I couldn't.

First, I baked a set of just leaves and turkeys for Thanksgiving down at Grammy and Grampy's house. I figured it could be both dessert and a craft to keep the kids busy. Then, since we invited a handful of friends over on Friday, I clearly needed to make a second batch of assorted critters for them to decorate.

Decorating is the best part! I don't care how old you are, last time I threw a birthday party for Caitlin where we had cupcakes and cookies to decorate, it was the adults that went nuts with it.

I was going to need a lot of different colors for the cookies, so it's a good thing I messed up the amount of icing I prepared. I had only meant to make 1 lb, but wound up putting almost 3x the amount of reconstituted egg whites into the bowl than I should have. Whoops! Almost 3 lbs of confectioners sugar later:


Finally, at 10 pm last night, it was time to make the doughnuts ice a sample cookie. After I finished the first one, I remembered that Bridget had created a tutorial on the design I wanted to do. So I started over again on a second cookie.

There! That's more like it! Feathers!

Eric watched me as I outlined, flooded and detailed the cookie and was very impressed.

Now that I've done it, I find it's actually pretty easy, but like everything else will get better with more practice. Good thing I've got a lot of icing!

It's also a good thing that I have plenty of volunteers to eat the cookies, too.

Just in case you're worried I'm not bringing anything else to the table but cookies, I've also made Heavenly Potatoes, cranberry-apple chutney, and multi-grain whole wheat sourdough bread for dinner. I didn't want to slack off. Heh!

Here's wishing you and yours a Happy Thanksgiving, with all the trimmings!

Wednesday, November 17, 2010

Things That Make You Go Hmmmm: Bubble Gum = Plastic

Did you know that bubble gum is made from plastic and rubber? It used to be tree resins (which sounds odd enough, but then again, aspirin came from tree bark, and that's worked out well), but in order to save money, it's now made from plastic.

No kidding.

So, if you spend a lot of time making sure your kid is drinking from BPA free water bottles and carries a waste free, metal lunch box, why would you let them chew plastic?

Because you didn't know, of course. But now you do.

Beth Terry mentioned this in her blog, Fake Plastic Fish, but I missed that article. Give it a read. It's eye opening.


Knowledge is power. Be powerful.

Monday, November 15, 2010

Hatchet in the Kitchen

Now that it's chilly outside and my gardening is severely curtailed (When did it actually become autumn?!), all of my excess creative energy is being devoted to baking.

We're in deep, deep trouble at Chez Hatchet, folks.

In one day, I had Swiss cream cheese setting up on the counter, apple butter cooking down in the crockpot and panettone-inspired muffins baking in the oven. I also have lovely iced sugar cookies on the counter and homemade marshmallows awaiting hot chocolate to swim in. Fresh bread is always readily at hand and I now have cranberry-apple chutney ready for Thanksgiving dinner (The flavors will meld together in the fridge this week.). I've picked up a handful more icing decorating tips, icing colors and came really close to buying 50 animal cookie cutters, but they were plastic, so I didn't. All I really wanted was a turkey, but I can make do without it.

I'm also testing out recipes for Xmas gifts, so some of the madness is just that: testing. The rest is just an outlet for creativity. And KA Flour (Now I feel a burning need to make pumpkin scones, just because I followed my own link. Ack!) keeps sending me their version of kitchen porn: their catalog. I'm so weak! So many of their items are terribly, terribly tempting! Also, there are recipes on every 3rd page! I...I have to try out those recipes!

Good thing I don't feel the burning need to eat all that I'm making! I keep giving it away. For my own safety, of course.

I made a yummy thing for dinner that I'd been wanting to try for awhile: Mark Bittman's recipe for Sweet Potatoes with Brown Butter and Sage. I hate sweet potatoes and marshmallows (Sorry Mom!) and really loved this. Now to get Eric to try it!

Stir-Fried Sweet Potatoes With Brown Butter and Sage
Recipe adapted from The New York Times, from 2008

3-4 tablespoons olive oil
2 to 3 pounds sweet potatoes, peeled and grated, 4 to 6 cups (I used a single large sweet potato, for about half the recipe)
Salt and pepper
1/2 stick butter, more to taste
4 cloves garlic, crushed
20 sage leaves (Good thing the frost didn't kill the sage plant out front! If you're allergic to sage like my friend Sierra, you could probably substitute basil, rosemary or thyme here.)
1. Put oil in a large skillet over medium-high heat. When hot, add sweet potatoes and sprinkle with salt and pepper. Cook, stirring only occasionally, until they change color and begin to brown, then stir more frequently until they are tender but not at all mushy.
2. Meanwhile, heat butter in a small saucepan over medium heat. Add garlic and sage; shake pan occasionally. When butter turns brown, turn off heat.
3. Use tongs to remove sage and garlic from butter. Serve potatoes drizzled with butter and garnished with a few sage leaves. Garlic can be served alongside, though it will not be super-soft.
Yield: 4 to 6 servings.

I ditched the garlic instead of trying to eat it since it was all chewy/crisp, which isn't how I like my garlic. I must admit that I really liked the buttery, crispy sage leaves! Mmmm! I'll definitely make this one again!

Well, I guess I'd better go check the chicken parts that are simmering in the crockpot. I'm making some broth for chicken soup. Should be yummy!

So...what are you cooking up this fall?

Updated to add: He liked it! He liked it! He never likes sweet potatoes! We have a winner!

Friday, November 12, 2010

My First Foray Into Cookie Decorating!

My first* attempt at cookie decorating was a resounding success! Plus, the kids had fun, too!

Oh and the cookies even tasted yummy. So this was a win all the way around.

First, there was my lovely assistant, Caitlin. She missed the dough mixing portion of this process, but was happy to show up for the cutting out and decorating parts.

I made Bridget's recipe from Bake at 350 and altered it for our elevation (i.e. added 3 tbsp of AP flour for a total of 16.2 oz, removed 1 tbsp of sugar for a total of 6.6 oz, and increased the oven temperature by 15 degrees from 350 to 365.). It worked like a charm (Although next time I'm going to try the reverse creaming method that Cook's Illustrated recommends. Some of my cookies had air bubbles.). Then, I followed the directions for rolling out the dough between 2 sheets of waxed paper as taught by Cheryl at the University of Cookie. Seriously. It's like I was meant to find these bakers! After rolling the dough out, I popped it into my freezer for about 7 minutes and then called to Caitlin for her assistance in cutting out some cookies.

We baked them off while the twins slept and then it was time to mix up some icing. I admit that I just bought a box of Royal Icing mix from the store. Next time I think I'll buy some powdered egg whites as Gail from One Tough Cookie suggests. I didn't have a lot of icing to begin with, so I kinda faked it and then split it into 3 colors. Little did I realize the sheer amount of complaints I'd have over the 3 colors. Once Logan had the purple, he wasn't happy about relinquishing it to anyone else. Emma was happy as a clam to just squeeze 3/4ths of the pink onto her first cookie. Only Caitlin and I were interested in multi-colored cookies and a little artistic expression.


My decorating team.


Logan works the purple icing with a death grip.

My first cookie didn't look anything like I'd really imagined it would, but as far as a first attempt went, it was pretty yummy! I got the hang of outlining cookies, playing with dots and figured out why round toothpicks would be better than flat toothpicks (Pointier ends!). It also made me understand that having a lot of icing to play with would have been ideal because then I could have messed around with the concept of flooding. Next time!

A peace cookie to celebrate Veteran's Day. Yes, peace can be a little messy and may not look like what you'd envisioned originally, but it's a good thing in the end.
Emma wanted to squeeze out the entire contents of the pink bag all over her cookie. I helped her out by spreading it around with a small palette knife.

Also, her idea of "eating" the cookie is to lick all of the icing off with her fingers. Logan smashed his first cookie, decorated the larger portion of it, and then had to be cut off from the purple icing. He was a sticky purple fiend in the end.

Don't mind my drippy nose. I'm a little sick!

Luckily enough for Eric, he made it home in time to decorate two of his very own cookies.

Caitlin went to town and made some fun cookies.


I found that once I started making my second cookie, that I didn't want to eat anymore. The prettier they became (by my standards), the less I wanted to eat them. Instead I had to nibble on the last bits of broken cookie bits. Slathered with a little icing, of course.


Now I know what I'll be bringing to Thanksgiving dinner at my MIL's: baked cookies and a pile of icing colors for the kids to go nuts with and decorate! (I'll probably also bring a loaf of bread and maybe even a pumpkin pie. I can't totally slack off!)


* I know. You're shocked, aren't you? I've made cookies before, but I've never tried making cookies for actual decorating purposes with Royal Icing and decorating tips. I had to do a bunch of research, search out all of my existing decorating tips and even pick up a few new ones. I was overwhelmed by the talent of Bridget at Bake at 350 and followed piles of links from her site all over the place. It's winter time and I'm trapped indoors. Clearly it's time to obsess over something that isn't plant related!
Related Posts Plugin for WordPress, Blogger...